Stress-Free Cheese and Charcuterie Board Making
It’s about time we get this blog rolling! Thanks for stopping by. For my very first blog post, I’d like to share with you some tips and insights into cheese and charcuterie board making; or if you want to be all fancy, call it “board styling”. After all, we are talking about the quintessential modern entertaining platter, which you can dress up or down to your heart’s desire.
Cheeseboard styling is probably one of the topics I get asked about the most, along with “Can I come to your house and watch you make a board?” and “Would you consider giving a class?” While at the moment I can’t invite people over to watch me preparing a board or teach a large class, what I can do is share with you some general guidelines and ideas so you can start practicing at home, just like I did when I first started styling boards a few years ago. Back then you would only see elaborate boards at events and functions where a caterer was involved, and rarely would those boards include the fancier, artisan cheeses, meats, and creative accompaniments we’re currently seeing in supermarkets and specialty food stores across the globe.
With its rise in popularity during the last few years, cheese and charcuterie board styling has gone mainstream. So much so, that Pinterest recently predicted “Epic Charcuterie” as the #1 trend we can expect to see in 2021 and given that 8 out of 10 of Pinterest predictions for 2020 came true – and its popularity across social media channels can’t be denied – I fully stand behind that prediction.
Cheese and charcuterie board styling can be as simple and casual or as detailed and complex as you’d want it to be. However, you don’t have to feel overwhelmed by the task and you certainly don’t need an elaborate plan to get it done. All you need to gather is some basic information and come up with a simple game plan.
So, get your notepad out and get ready to start styling – my way!
How many people will you be serving?
The very first thing you need to know before starting to shop for your cheese and charcuterie board is how many people will you be serving it to. This is necessary to determine how much cheese, meats, and accompaniments you’ll need to buy to feed your party. If you conduct a simple search on the internet for this topic, you’ll find plenty of opinions out there. I share mine, below.
Board or Surface Selection
Let’s get real here. Even though they’re generally called cheese and charcuterie boards, you don’t really have to prepare one in an actual “board”. While nothing really compares to the elegance a beautifully made wooden or marble board brings, any serving platter, cake board, cake stand, tray, lazy susan, container, and even your kitchen table or island surface can be used to prepare a board. My most viewed board on @themodernhostlife Instagram was not made in an actual “board”. It was made on top of a placemat! Yes, a placemat over which I placed multiple layers of food safe paper. So, as long as you have a food safe surface or use food safe paper to properly cover the surface where you’ll be placing your food items, I’d say go ahead and use whatever you have on hand.
Do make sure the “board” or surface you want to use is sufficiently large to hold everything you want to use. One thing I do is prepare a mock setting of the cheese and small bowls or jars I’ll be using for the placement of jam, honey, olives, etc., on top of the surface I want to use. From there, I try to eyeball whether there is enough room left to place the rest of the ingredients. If I am still not sure, I try to choose a surface that’s a bit larger than what I think I’ll need because ingredients can always be arranged in the center and borders can be left empty to place cheese knifes, picks, etc., or simply to showcase their beauty.
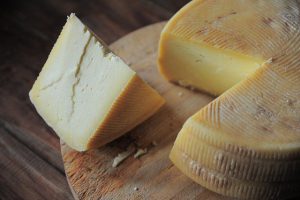
Cheese Selection
While I’m in no way a cheesemonger (i.e., cheese expert) a basic rule of thumb you can follow for crafting your ideal board is to select anywhere from 3 to 5 cheeses varying in texture, color, and shape. For my boards, I typically add 2-3 ounces of cheese per serving. So, if you’re planning on creating a board serving 6 persons, you should plan to use a total of approximately 12 to 18 ounces of cheese. In that case, using 3 cheese selections of approximately 4-6 ounces each would perfectly fit your party.
When it comes to texture, I look for and select my cheeses as follows:
One soft (creamy/spreadable) cheese, one semi-soft or semi-hard cheese, and one firm/hard cheese. If using more than 3, then I try to add an aged cheese and/or a cheese with an interesting or bold flavor, such as blue, stilton or a cheese with some spice or seasoning in it. If you don’t want to do a whole lot of research around which cheeses fit the texture description, at the end of this post I offer a handy-dandy list of popular cheeses in each variety.
Here are some additional tips for cheese selection:
- Don’t forget to use at least one cheese that sits more on the milder flavor side because not everyone likes complex or bolder cheese flavors.
- Try to use cheeses that feature textured rinds or colorful wax coverings to add some color and visual interest to your board.
- If you end up with cheeses that are similar in shape, try to cut them in cubes, slices or wedges or somehow break them off to add some more texture to your board.
Charcuterie Selection
Charcuterie is the generic name given to cooked, processed, or cured cold meats and meat products that we typically see in cheese and charcuterie boards. If a board does not have any of these types of meats, then it shouldn’t really be called a charcuterie board. These types of meats and meat products have an interesting artisanal story and are the result of humans’ efforts to preserve meat before refrigeration was ever invented.
The ideal cheese and charcuterie board, in my opinion, should have anywhere from 2 to 4 types of such meats. Most charcuterie is a by-product of pork, but there are other options that instead use cured beef, lamb, duck, and other types of meats and are still considered to fall within the generic definition of charcuterie. For my boards, I typically add .75 to 1 ounce of charcuterie per serving. So, if you’re making a board for 6 guests, plan to use a total of 4.5 to 6 ounces of charcuterie.
Crunch Selection
Every good cheese and charcuterie board needs to have some crunch. This can be simply done by adding a variety of nuts, seeds, crisps and crackers, or even a crusty, rustic bread.
For an ideal board, I’d recommend using a plain cracker, crisp or crusty bread; a peppered cracker or a cracker featuring spices or a mix of both; and a cracker that includes some sort of dried fruit and seeds. Nuts can be plain, salty, spiced or even candied. I also love including nuts and espresso beans covered in chocolate!
I don’t think there is a minimum or maximum amount of crackers to be placed on a board. My advice would be to place however many you can fit into your board (while ensuring they look visually appealing) and if you think they won’t be enough, just place a bowl with more crackers next to your board.
Accompaniments
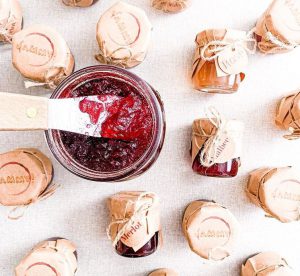
Modern-day boards can feature a wide variety of accompaniments in addition to nuts and crackers. From fresh and dried fruits, to olives, cornichons (those look like very tiny and textured pickles), pickled or roasted veggies, sweet or milder peppers and artichoke hearts, to jams, preserves, honey and other sweet or savory dips and spreads, the options are endless.
Accompaniments give the perfect opportunity to add some acidity and a combination of flavors that can bring your board to the next level. Choose wisely, though. For instance, not everyone enjoys olives, pickles, or artichoke hearts, so unless you know of a particular preference, perhaps you’re better off including smaller portions of each, or opt for including milder, sweet peppers.
Garnishes
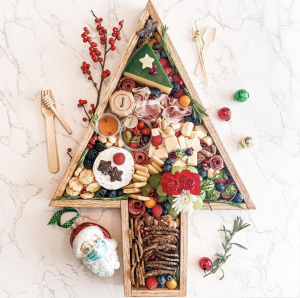
Garnishes can take a board from looking nice to Instagram-worthy! Presentation is key. Fresh herbs, like rosemary, sage, mint, basil, and thyme are not only great for filling in gaps, adding texture and even height, but they are also incredibly suitable to add some nature-inspired details to a board and give it a sense of abundance.
Likewise, pomegranate or other types of colorful, edible seeds and flowers can be used to add visual stimulation and communicate to your guests that you have put the highest care in creating an attention-grabbing experience for them; and they will thank you for it.
Board setup
I believe there are no strict rules behind a board setup. Every board creator out there has their own method, and this is entirely fine. I am all for creative liberty. As I mentioned above, I typically prepare a mock setting including the cheese and all the small bowls or jars I plan on using for the placement of jam, honey, olives, etc. Those are the items I’ll be placing first on my surface and then work the rest of the ingredients into the left-over areas.
I typically place meats after the cheese and containers, followed by the crackers and the rest of the accompaniments. If you’re using fresh grapes, though, my advice would be to place them right after the cheese and containers, as grapes take a lot of precious board real estate and they will be too difficult to place after you’ve done the meats and crackers.
It is entirely fine to arrange the meat, crackers and accompaniments in a way that makes sense to you. For instance, you can cluster cheese, meats, crackers, and accompaniments that pair well together. Or you can follow a particular color scheme, clustering items in the same or similar color palette. You can also use a laissez-faire approach and place your ingredients just wherever they fit, and then go back and forth arranging and rearranging in a way that feels visually appealing to you. Honestly, you do you.
Garnishes will always be the last thing to go in a board. While they are essential to the overall look of your end product, they’re just details that will enhance the look and feel of the board. You can do minimal placement if your board is already colorful and full of texture and visual appeal. However, you can also go big and use a maximalist approach if you feel the occasion calls for it, or you have beautiful garnishes that can take your board to a whole other epic dimension.
Do it yourself
Now go and start creating your board! If you have any questions for me after reading this post, feel free to comment or reach out privately. I will do my best to answer the questions or steer you in the right direction. If you do make a board using my stress-free guidelines, post a picture to social media and mention and/or tag me @themoderhostlife in your pictures. I’d love to share your creations!! Oh, and don’t forget to grab my handy list for selecting cheeses by texture; it does make life easier when you hit your favorite supermarket or preferred specialty food shop.
And please… always remember you should not feel overwhelmed by this task; cheese and charcuterie board making is fun. I promise you!

Free List of Cheese by Texture
Sign up here and be emailed my handy list of cheeses by texture for creating your next board!
Thank you!
The link to the list will be emailed to you!

Karem
In my life, happiness and satisfaction come from the time I get to spend with people whose company I enjoy.
Instagram Feed
Comments
ABOUT ME
ATTORNEY, BLOGGER & SOCIAL CONNECTOR
Gatherings are my thing. I immensely enjoy spending time with those I love over food, drinks and lively conversations. In my life, happiness and satisfaction come from the time I get to spend with people whose company I enjoy.
RECENTLY ON THE BLOG
7 thoughts on “Stress-Free Cheese and Charcuterie Board Making”
What a beautiful blog. Thank you for the valuable information.
Thank you so much for the information it was much needed and helpful. I’m very excited to be a part of this journey. wish me luck!
I would love some info on prep time & timing
What can i do a few hours ahead ?
1 hr ahead ?
How soon to put out at room temp ?
Temps of cheeses to make it easy to slice or to spread
Thank you
Pingback: Cheese board to surprise your guests - Deliart
This was a great blog and very helpful. Thank you !
Thank you so much for the blog! I had no idea why I’m losing money but I’m overstuffing the boards and prices much too low.
Glad to hear it was useful!